Tips and tricks
 1. Save some space. You can save some screen real estate by tucking controlAid under the menubar at the top of the screen. Tab through the different sections using cmd+option+tab. The lock button will keep you from accidentally moving the window around.
-

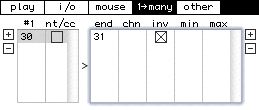
2. Create an effects crossfade. Open the Live setup included with controlAid. In the one-to-many tab of controlAid, create a new start CC message by clicking the plus button on the left hand side. Enter 30 for the start message (#1). Leave the note/cc box unchecked (checking it looks for a noteOn message instead of a CC). Create a new end message to be triggered by cc 30 by clicking on the + button on the right hand side. Enter 31 for the end value and check the invert option. When you turn a knob mapped to CC 30, you should now see the reverb send mapped to CC 31 move inversely.
3. Use controlAid with a Griffin PowerMate. Use the keystroke -> midi feature found in the "other section" of controlAid. Note that cmd+5 and cmd+6 are automatically mapped to channel increment and channel decrement respectively. Setup your PowerMate to send cmd+5 and cmd+6 when rotating left and right, and you have a nice big knob for channel selection. By choosing other note messages to be generated by keystrokes via controlAid, you can also configure your PowerMate to record enable any track, start and stop any clip, delete the currently selected clip (mapped to cmd+4)... there are many possibilities. I velcro my PowerMate to my Moog Liberation (an analog keytar) for remote control of controlAid. You could do the same with the pickguard of an electric guitar or bass.
4. Using controlAid with an Oxygen 8 or a Radium. One hint for this is that the Oxygen and Radium automatically map the main data slider to CC 7. This becomes a good choice to use as your channel selector in controlAid.
5. Use your keyboard controller for remote control and soft synth performance. Split the note/cc messages generated to different virtual outputs using the midi matrix. This allows you to use the knobs/faders of your controller for remote control of track/VST parameters, while using the keys to control a soft synth without having to worry about their noteOn messages triggering clips in Live.
6. Create the ideal Live/Reason performance setup. Using the methods described in the quickstartReason instructions, setup your synths in Reason to respond to different channels using the Advanced MIDI preferences. Setup tracks in Live to accept the ReWire audio from the corresponding synth. For example, track 1 in Live would accept Rewire signal from whichever synth in Reason is set to receive MIDI messages on channel 1. Track 2 in Live would accept Rewire signal from whichever signal in Reason is set to receive MIDI messages on channel 2 etc. Now the channel selector feature in controlAid not only controls which track you are recording to in Live, but also selects the corresponding synth you are playing in Reason, all by moving one knob or fader.
7. Scale your effect controls. Let's say you have a knob controlling a filters cutoff frequency, and you want to limit the sweep of the knob. In the one to many tab, add a new start trigger by hitting the plus sign on the left side of the controlAid window. Select the CC whose value you wish to constrain. Using the plus sign on the right side, add an end value with the same CC selected, and no channel selected. This tells controlAid to not create an additional value, but rather that you wish to alter the initial MIDI message controlAid received. Use the max and min fields to select the range you would like to scale your control to.
